People who have played Fallout Shelter will recognize many of the features in settlements. The building process also reminded me of The Sims. I’m going to help you get started by explaining everything about settlements and give you tips to create the best communities you can.
If you’re looking for more help with the game, visit my Fallout 4 Beginner Tips and Tricks.
This guide will go over everything about settlements in Fallout 4 including:
Settlement Basics - Info on what you can do with this feature, perks to look out for, and tips. Structures - The basics of building things like houses. Furniture and Decorations - How to keep the interior looking good. Resources, Power, and Defense - What you need to keep your settlements running, and how to defend your settlements when they get big enough. Crafting and Stores - Ways to bring in extra money and items.
Settlement Basics
The biggest part of building a settlement is the actual building. You’ll want to build houses, forts, or whatever to make an actual home. Any place that has a workshop can be used as a settlement.
Most of the time, you’ll need to clear the area out or do a quest to unlock it. Here are some things to look for when getting started.
Structures - The buildings and fences to keep your settlement enclosed. Furniture - Things to put in your building, or even outside if you’re into that. Decorations - If you’re going to live in a post-apocalyptic world, you might as well make the most of it.
Go to the workshop of your settlement to start building. When you pull the menu you up, you can move around and select any of the features.
You can exit the menu at anytime and bring it up again without going back to the workshop, as long as you don’t go anywhere else. You can also build defenses, power, resources, crafting areas, and stores. I’ll explain those later.
You’ll need resources, such as metal or wood, to build anything. There are a wide variety of materials needed, depending on what you want to build.
Tips
You can scrap things you don’t need while in build mode. Use this to scrap everything at a new settlement that you don’t want. You can focus on one building at a time and scrap everything else for more materials. If you use an item during crafting instead of breaking it down for materials, you lose any extra materials that the item has that are not used in the recipe. You can also scrap items in your inventory. Just drop them on the ground, then open the workshop menu. Target it to scrap it. You can rotate items and move them around, even after placing them. Xbox - Press RT or LT to rotate right or left PC - Right or Left mouse button PS4 - R2 or L2.
To assign someone to something, go the build mode, select the person, then select what you want to assign them to.
Perks
If you want to access extra features in settlements, you’ll want to get at least 6 Charisma. This gives you access to the Local Leader Perk, which has 2 ranks.
Rank 1 - Establish supply lines between your workshop settlements. This allows you to link your settlements through supply lines. Target someone, then pull up your list of settlements. Select the settlement you want to make a supply line to. This assigns them to travel between the 2 settlements. Linked settlements gives access to the inventory of any settlement linked to that one, as well as share resources. This includes food and water. If you have enough food shared between your settlements, you won’t need to plant food at every settlement. You would need a lot of food to do this, though. Rank 2 (Requires level 14) - Allows you to build stores and workstations at your settlements. When you get this perk, you can build stores that can bring in more caps and items. You’ll have to assign people to work at them. You can also build any workstation so you can put all your crafting in one place.
These are important perks, but I wouldn’t worry about getting them until you have multiple settlements and you start building them up. You can’t get the last rank until level 14 anyway, so you have time.
Below are a list of perks you need if you want access to everything in settlements:
Gun Nut Rank 3 - Require Int 3 and level 25. Science Rank 3 - Requires Int 6 and level 28. Hacker - Requires Int 4. Medic - Requires Int 2. Cap Collector Rank 2 - Requires Charisma 1 and level 20.
Structures
You can build walls, floors, roofs, stairs, doors, bridges, and fences in this section. There are 2 types, wood and metal. Some of the options in each category use both wood and metal.
This is where you want to start. You want to have at least one enclosed house so your people aren’t wandering around outside all the time.
When building walls and roofs, most of the items can connect to each each other. When you are placing of these, the object snaps into place to show that you can do it.
These items add up quickly and your resources will be gone before you know it if you aren’t paying attention. Just focus on building one house at first, preferably one that already has parts built.
When you get everything else you need, you can start adding fences and other things around the settlement.
Furniture and Decorations
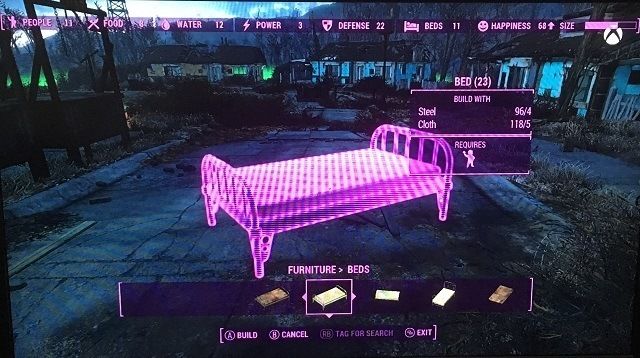
The only immediate thing you need in this category is a bed. You need at least 1 bed for every person on your settlement. Other option in this category include: chairs, containers, shelves, tables, TVs, paintings, vending machines, and more.
These are nice additions to make your place look better, but one of the last things you should worry about.
Resources, Power, and Defense
This is the most important section to build and maintain. Resources has everything you need for food and water. You need to keep this high so your people have enough to survive.
Food, Water, Etc.
You can place a water pump, and any vegetables you have, in dirt to supply water and food. You need to assign someone to the crops you plant so they can gather food while you’re gone.
You can also build a Scavenging Station that you can assign someone to. This gives resources like steel and other things used for crafting and building. What you get is random, though.
Power
When you start building up your settlement, you’ll want to bring in more people. You can build a recruitment radio beacon to do this. It needs power to run, so make sure you build generators. You can also build terminals and place lights, which also need power.
To power things up, place a generator close enough to the object you want to power. Make sure there are no obstacles between them, then choose “attach wire”. Move the wire to the object you want to power until it snaps into place, then select “attach wire” again.
Defenses
Finally, you’ll need to defend your settlements from raiders and other dangers. Each item in this category has a defense value. Your settlement’s defense value should at least be equal to the sum of your food and water. So if you have 6 food and 5 water, your defense should be 11 or higher.
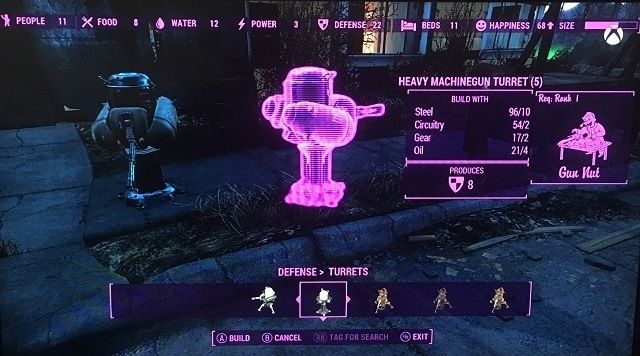
You can place guard posts, which you must assign people to. You can also build turrets and traps. The machine gun turrets don’t require power, but everything else does. These are all automatic so you should focus having more on them.
The heavy machine gun turrets offer a good defense with no power cost. You only need Gun Nut rank 1 for them. Placing 2 or 3 of those around your settlement should be all the defense value you need for a while.
Crafting and Stores
If you have the local leader rank 2 perk, you can build in this category. When you establish enough settlements, you won’t need to make workstations, but it can still be useful.
It is nice to have all the workstations at one or all of your settlements. Plus, it is good to have access to power armor stations at all of your settlements.
Stores can bring in caps, make settlements happy, and offer you items to buy. You can build trader, armor, weapons, food and drink, clinic, and clothing stores. The more expensive stores give you more options.
Each store needs a person assigned to run it, so keep that in mind when building. You can get the caps by selecting transfer at workshop and going over to Misc. Now, just transfer the caps to your inventory.
This concludes my Fallout 4 Settlements Info and Tips. Feel free to ask any questions in the comments.


